Posted on Leave a comment

Sled wrap, Snomobile hood & Tunel wrap applied by a first time user Mike Nicholson

Sled wraps, graphics, decals & more.. custom desing, you create we produce, peel & stick 814-838-6377Sled wraps & graphics, custom designSnowmobile wraps, graphics, decals & more.. contact us for you custom desing today: powersportswraps.comDo it yourself snowmobile wraps, just peel, stick & ride… we have over 200 stock patterns or custom availableSnomobile wraps, custom designed sled wrap, peel & stick wraps for Snowmobiles

Special thanks to Mike Nicholson for sending in some quick photos of his Ski Doo sled hood just after application.  Mike is a first time user of our products so he was a bit unsure of how to apply & the proper techniques to use.  We spent some time with Mike in the custom design of this amazing Venom hood wrap for a snowmobile but all the work was worth the effort as you can see.  We have over 200 wraps to choose from  on our website or we can create a custom vinyl wrap just for you. Contact us today & we’ll get you rocking for the up coming sled season…

Mike writes: Just wanted to thank you for all your help during the design process of the wrap for my sled. The finished  product looks great and the install went well. Here are a couple pictures of the sled completed.


866-289-2358

Shop our Sled wrap website

Posted on Leave a comment

Guitar Rock Wrap, Vinyl wrap applied to a Shale rock that’s in the shape of a Guitar

Vinyl decal wrap on a slate rock stone in the shape of a guitar powersportswraps.com
vinyl wrap on a slate stone in the shape of a guitar, peel & stick wraps, do it yourself powersportswraps.com
vinyl wrap, guitar wrap, rock guitar, slate rock wrap, vinyl guitar, guitar image, stone wrap,  Powersportswraps.com

Yes, it’s true… a company first we wrapped a rock.  Our customer found a rock in the shape of a guitar while walking the a creek.  It just happens that her husband is the lead man in a very popular local blues band www.dukeshermanband.com.  Somehow she got the crazy idea to see if we could apply the remainder of the guitar elements on the rock along with their name so they can display it in there front yard.  What a cool idea…. & to my amazement it worked..  Powersportswraps.com

Posted on Leave a comment

P40 Warhawk Flying Tigers Shark Face bike wrap, peel & stick wraps… do it yourself

bike wraps, motorcycle wraps, stunts, wheelie, bike skinz, 636, 636 wrap, vinyl wrap, super stunter John Yaz, PowersportswrapsFlying Tigers bomber bike, P40 shark face sport bike wrap, do it your self bike wraps shop online PowerSportsWraps.comSport Bike wraps, do it yourself apply, flying tigers shark face bike wrap, create your own PowerSportsWraps.comP40 warhawk flying tigers bike wrap, peel & stick apply, do it yourself & save $$ powersportswraps.com

This P40 Warhawk sport bike wrap can be created using our Dirty Aircraft Metal  vinyl wrapping film by the sheet & our all new Flying Tigers Shark Face element.  Each item is a peel & stick application so you can create the look you want.  Do it yourself vinyl wraps are our specialty, mix & match a variety of films for your own custom bike wrap look.  As you see in the photo we also applied our Kawidigi Kawasaki Green, White & Black Digital camouflage for that extra custom effect.

Our sport bike wraps are produced using high quality wrapping film with a Glossy or Matte sheet laminate applied over top of the image for that extra added protection.  This combination of the two films (wrapping film & sheet laminate)makes this product extra thick 4.75 mil & easier to apply, plus you have the ability to remove the wrap up to 4 years with little to no adhesive residue.  Contact us today for your custom  sport bike wrap.

phone: 866-289-2358


Posted on Leave a comment

Carbon Fiber Blue Scooter wraps for all makes, custom decals, graphics for scooters, peel & stick vinyl

genuine rattler scooter wraps, blue carbon fiber vinyl, scooter decals, scooter graphics, scooter parts, from powersportswraps.comvinyl wrap, carbon fiber Blue, scooter wraps, scooter decals, diy wraps, sport bike wraps,Scooter wrap, vinyl scooter decals, sport bike vinyl wraps, scooter, scooter decals, wraps,

Another one of our Happy scooter customers…. comments:

I was looking for a new look for my 2006 Genuine Rattler scooter.  I also wanted a custom look that would set it apart from the other scooters.  I found what I was looking for with PowerSportsWraps.com.  I have one of the most unique scooters in the Chicago area.  It looks great in the carbon fiber blue pattern & it looks like the body panels were molded from carbon fiber.  See Carbon Fiber patterns here!!

The team at Power Sports Wraps was INCREDIBLY helpful!

Tim Wall

SHOP OUR  DO IT YOURSELF VINYL WRAP WEBSITE

CONTACT US: 866-289-2358


Posted on Leave a comment

Ducati 999 wrap Bike wrap,

Vinyl Bike wrap on Ducati 999 track bike for allaboutbikes.comDucati 999 bike wrap for allaboutbikes.comDucati 999, Ducati 999 wrap, Ducati 999 Bike wrap, Ducati 999 decals, Bike wraps, Vinyl Wraps, Ducati graphics, allaboutbikes, allaboutbikes.com, custom bike wrap, vinyl bike wrap, diy wraps, diy decals, motorcycle wraps,

Last year we were contacted by Julian Taylor Editor-in-chief of Allaboutbikes.com to assist on a track bike project.  He asked us if we would produce & apply a custom designed wrap that they had created.  We were excited to participate since we love bikes, racing & Ducatis so he did not have to twist our arm to hard to get us to agree.  The Ducati has a hot bodies race skins on it which were White when we got the bike.  We had to sand the complete body down with 400 grit wet- dry sandpaper. (special thanks to Brad Parmerter for the sanding)  Once the body was smooth we had to tape & paint all the areas that would be exposed, flat back so they did not stick out once the vinyl wrap was applied.  The above pictures are the final results of many hours of hard work.  You can see this bike & photos of the complete project at allaboutbikes.com  they are doing a extensive article on the project.  This bike will be used for some 17 track day events this year & will appear at a wide variety of bike shows & meets throughout the 2010 season.  Julian is an instructor at both the Nelsons Ledges & Beaverrun race tracks here in the NE.


If you have a track bike or race bike & are looking to personalize it or have a custom motorcycle wrap produced feel free to contact us & we will come up with a look that fits..

Shop wraps: www.powersportswraps.com


Posted on Leave a comment

Dodge Challenger Vinyl Wrap Application Tips & techniques

vinyl wrap application tips, how to apply a wrap, do it your self wraps www.PowerSportsWraps.comHow to apply vinyl graphics on Dodge Challenger, decal application tips from PowerSportsWraps.com 

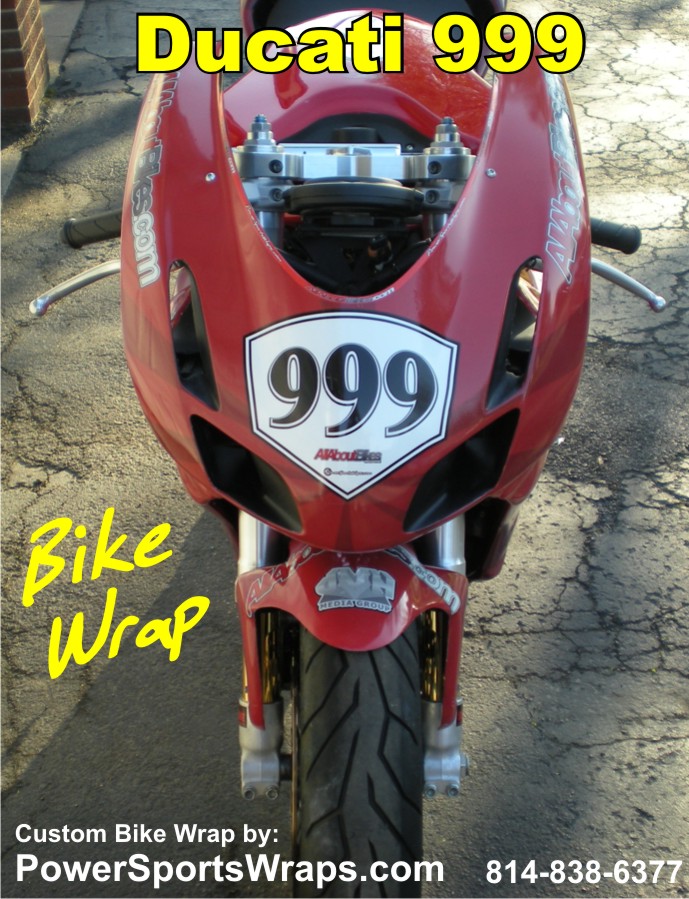
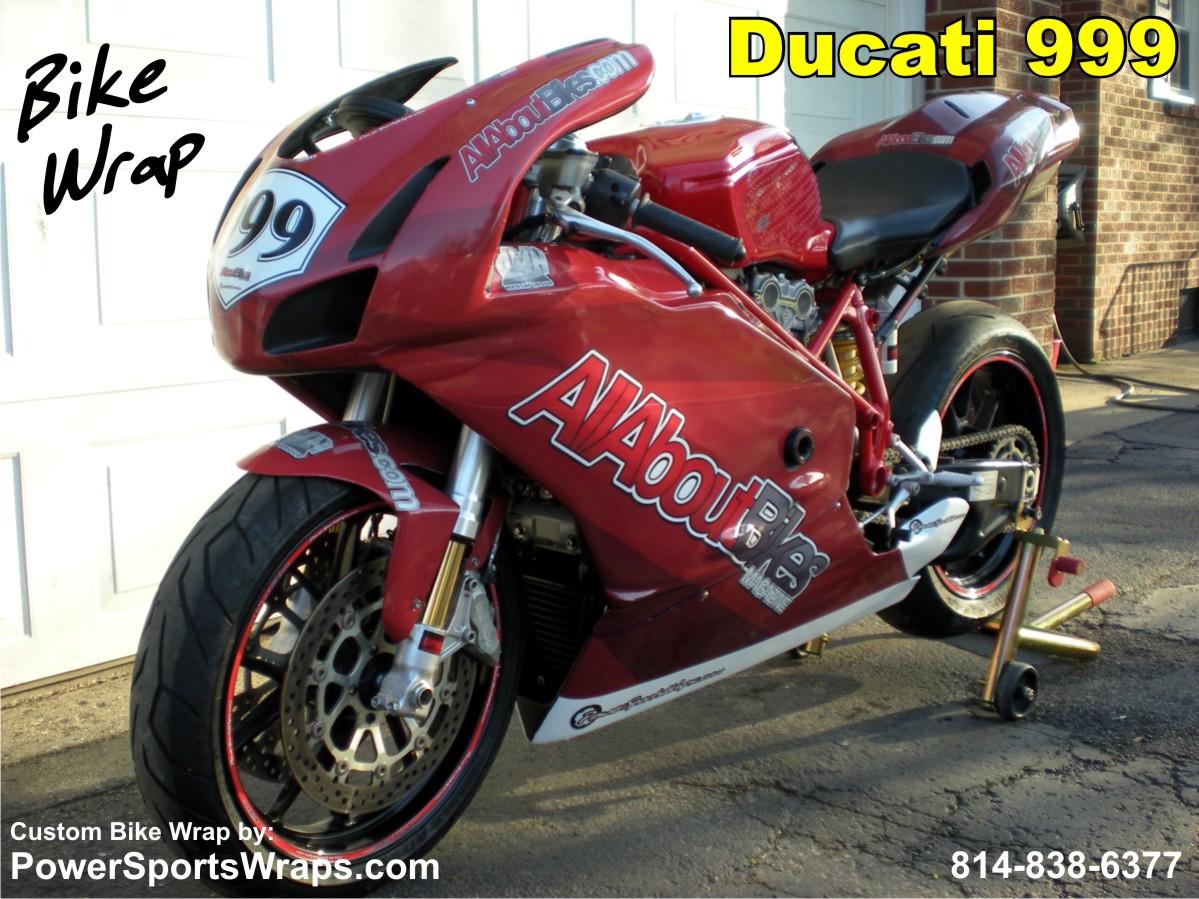
BELOW ARE THE INSTRUCTIONS & NUMBERED PHOTOS FROM OUR CUSTOMER CHUCK ON HOW TO CREATE & APPLY THE VINYL WRAPPING FILM AS IT APPEARS ON HIS DODGE CHALLENGER.  THANK YOU VERY MUCH… CHUCK . POWERSPORTS TEAM…

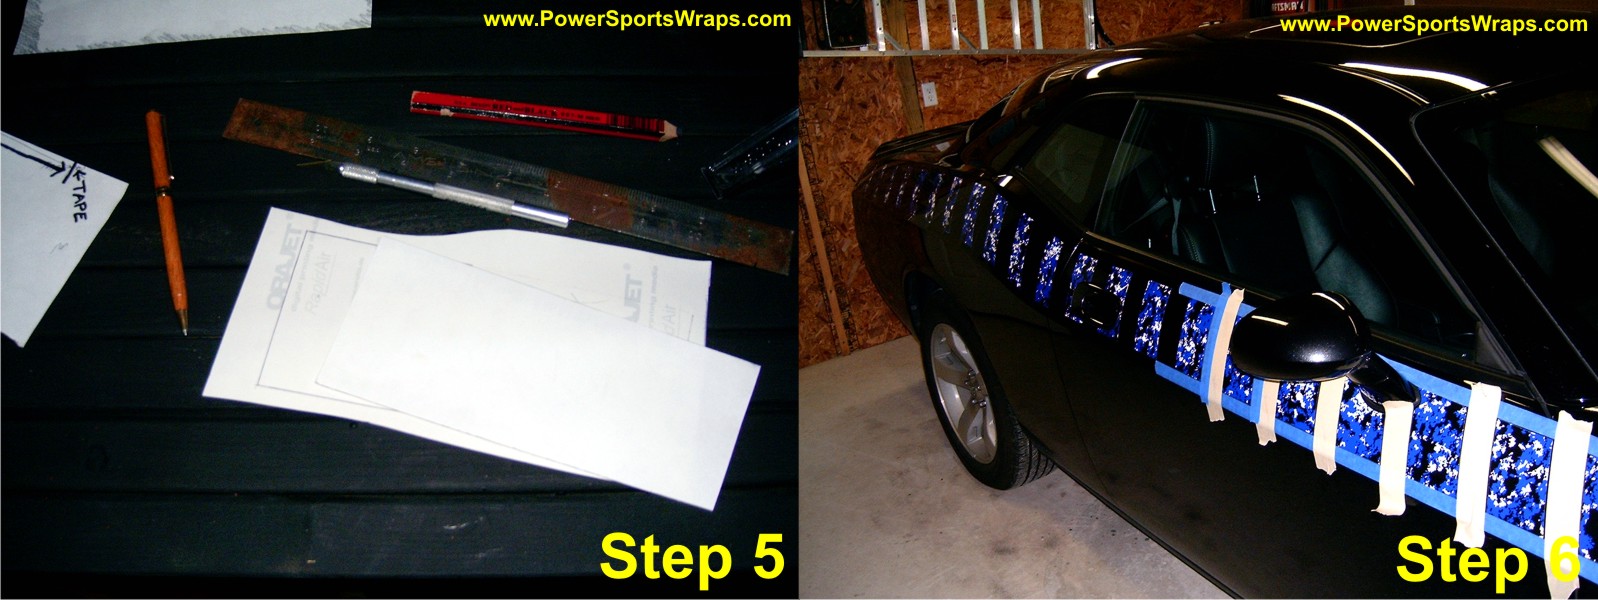
I began step 1 by surfing the internet to find a pattern similar to what I liked. I found the strobe style the most beneficial due to the fact that being all small pieces I could make them from a 2×4 sheet and not see seams. I went with “Moto Blue“. I chose your product because of the thickness and apparent durability. The selection was also great. I made a good choice. Step 2 was prep and initial taping of the car. I started by giving it a thorough wash with dish soap in the areas I would be working. I followed the bath with a good lint free towel. After it dried I used good old fashioned masking tape. (we recommend 70% alcohol wipe as well, prior to application)  Using 1″ tape, I followed the body lines of the car going horizontally from the back bumper seam to the front bumper seam. It was a bit tricky making the bends and around the top of the mirrors.In step 3 I applied the diagonal tape going the length of the car. As the distance of the columns between the stripes got bigger, the stripe width got smaller. To accomplish this I made a gauge out of scrap paper. It would measure from the beginning of one diagonal tape column to the beginning of the next. I taped off the front bumper seam, and I used the front door seam to give me an approximate angle to follow. Once I had the angle I wanted, I used a strip of 1″ tape for the first diagonal tape column. After that it got easier. I used the gauge to mark the rest of the diagonal tape locations. I applied one mark on the top strip of 1″ tape, and one on the bottom strip.Complete the taping before applying the stripes. Determine how wide you want the rest of the stripes. I had to change column widths a couple of times due to overlapping the front and back door seams. My next two columns were 1″wide; after that the next four were 1.5″. Five were at 2″, five more at 2.5″, four at 3″, and three at 3.5″. The last five columns were two 4″, two 4.5″, and one at 5″ wide. At this point was where I looked for flaws and decided if it was the pattern I would stick with.Step 4 consisted of making templates by dry rubbing. This step took quite a bit of paper. Starting at the front, I set a piece of paper over the first stripe hole and dry rubbed it with a pencil to get the shape of the stripe. Then I cut it out and marked the template. I numbered each one left 1, left 2, etc. I did not destroy the templates when I was finished. I am keeping them in case I ever have to replace a damaged piece.Transferring the template to the vinyl made up step 5. I flipped the template upside down and traced it on the back of the vinyl sheet. I kept them as close together as possible, so I would not waste the vinyl. I made sure to mark the back of the vinyl appropriately. A razor blade was used to cut the vinyl. Scissors did not work; they distorted the vinyl when cutting.The last step was cleaning the areas with 70% rubbing alcohol, letting it air dry, and applying the vinyl. I used the squeegee and followed the directions that came with the vinyl. This was by far the easiest and most gratifying step. There were a couple of times I had to re-lift the vinyl because of an air bubble being trapped. The Vinyl was actually pretty easy to work with. STEP 6. FINALLY I removed the tape to admire the new stripes. The whole job took me a couple of days, but I definitely enjoyed it.SHOP FOR VINYL  WRAPS: www.powersportswraps.com

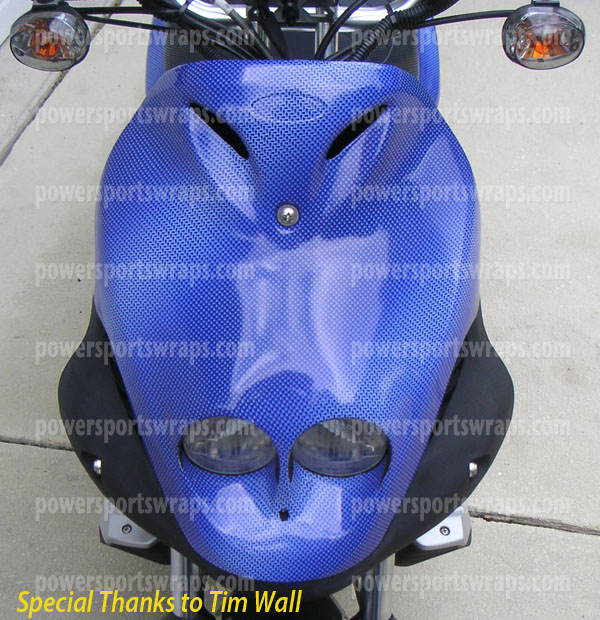
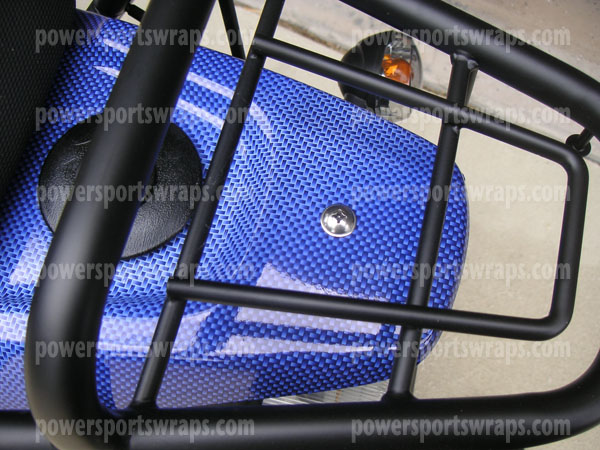
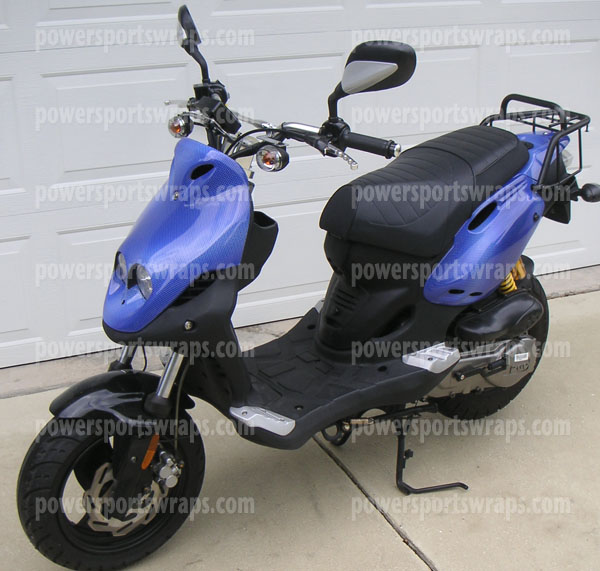
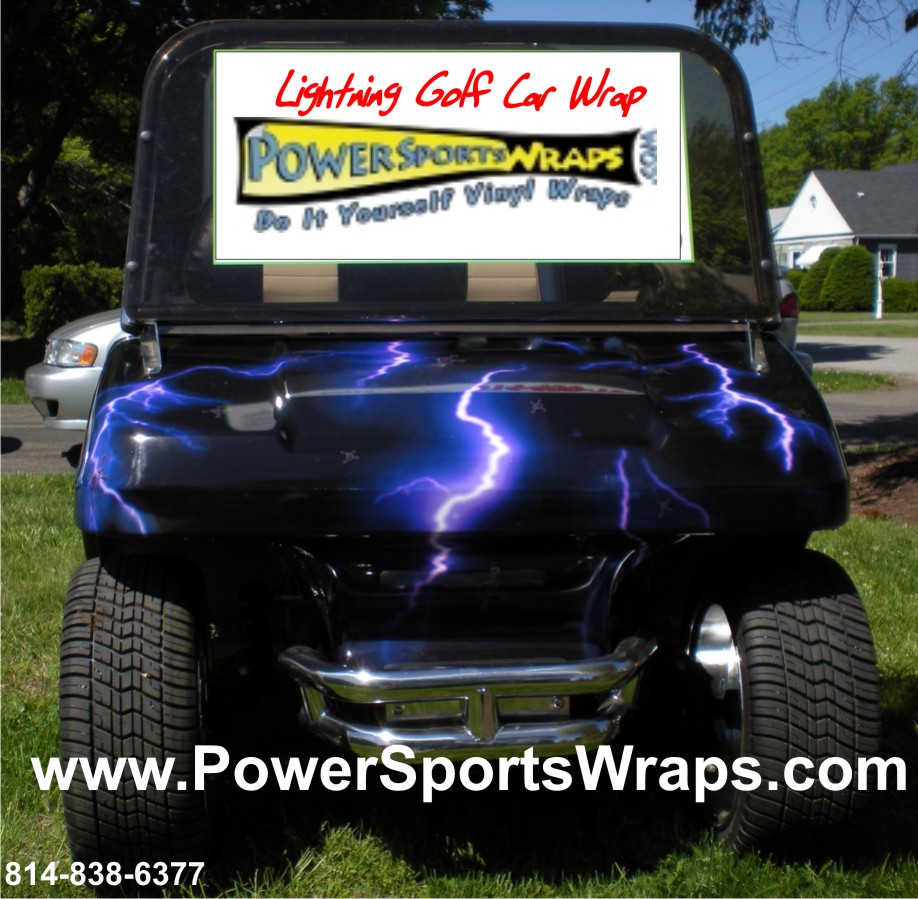
ORDER DIGITAL MOTO BLUE CAMO:

CONTACT: 866-289-2358


Posted on Leave a comment

Lightning Purple Golf Car Vinyl Wrap, Golf Car Decals, Wraps

golf car decal wrap in vinyl, just peel & stick do it yourself don’t paint cost under $400.00 to do this. call 814-838-6377lightning golf cart vinyl wrap for under $400.00 Wow save $$ Do it yourself applyGolf Car Wraps, Golf car decal, golf cart wraps, golf cart decal, decals, vinyl wrap, cart wrap, cart covering, car wraps, decal wrap, vinyl wraps, custom wrap, custom golf car wrap, vinyl decal wrap, Body Skinz, Body Skins, Golf car skins, Golf cart skinz, golf car skins, vinyl covering

This golf car was used as a demo car to promote golf car warps locally. It was
also used to create our golf car wrap video
to assist our first time users as they apply the wrapping film.

The best part of the car has to be the amazing vinyl wrap that has the skulls
& lightning effects in it.  This process is much more cost effective than paint & can
be applied by the average dealer or consumer which saves them money.

The car was a work in progress & we added parts as time progressed.  We also used
the car to prototype new parts for the golf car industry such as the carbon fiber rocker
kit, chrome steering tube, vinyl wraps & graphics kits.  See our complete line of
golf car products on our completely new website at: www.golfcargraphics.com

If you have a golf car DON’T PAINT IT ….. WRAP IT!!!    CALL US & SEE HOW EASY IT IS…

Contact us with your wrap ideas & we can custom create a wrap just for you…

ORDER LIGHTNING WRAP: 


www.powersportswraps.com

www.golfcargraphics.com